SwipeClouds® Angular Mobile App Framework
by Bill SerGio
 |
| ||||||||||||||||||
Introduction
I have always liked the look and feel of JQuery Mobile and wanted to see how JQuery Mobile's styling would look in an Angular Mobile App where we let Angular control the DOM but take advantage of JQuery Mobile's cool Plugins and styling. All the frameworks above like Xarmin, Ionic, Sencha Touch, NativeScript, etc. are NOT needed with Angular 2 to build a really cool, fully-functioning Angular 2 Mobile App.. This article demonstrates how to use JQuery Plugins in an Angular 2 Mobile App and includes lots of functionality. For the main GUI in this Angular 2 Mobile App I decided to use an amazing JavaScript canvas plugin by Graham Breach which I made some changes to for this project. For scrolling I used the JQuery plugin iScroll v4.2 by Matteo Spinelli. If you are tired of the same, boring look and feel of most mobile app frameworks listed above, then checkout my approach, which doesn't have any Ionic, or any of the third-party componets listed above. The Angular 2 Mobile App in this article is designed to motivate people to download the app and use the app MORE than once a week---why? Because it gives people access to millions of video, TV shows and HD movies or their mobile phone or Smart TV where people can easily search and find any type of content they enjoy. And the app allows you to deliver videos from your YouTube Channel or any tube server that sell your product or service to anyone who has downloaded the app.
To run the compiled code to see what the Angular Mobile App looks like just open the www.zip folder in Visual Studio as a website and you can see what the app looks like. Later, after you have created the project you can run it from Node.js. If you just want to see the working app I posted the compiled .apk file forAndroid on my website and you can just scan the QR Cod below to wnload swipeclouds.apk on your Android mobile phone.

I put a fully working demo of the SwipeClouds® Angular 9 SwipeClouds Mobile App online at:
http://www.swipeclouds.com/simulator.html
Watch a video I created to demonstrate some of the features of the SwipeClouds® Angular SwipeClouds Mobile App Video Framework at:
https://www.youtube.com/watch?v=vx1Z8PfCLYo
I believe that a first app in Angular should have more than just the basics so my sample project includes:
- Angular SwipeClouds® Interface That Works with Both Local & Remote Images
- Access to Millions of Videos, TV Shows & HD Movies from Hundreds of Tube Servers
- Local & Remote Ad Delivery System So You DO NOT Need AdMob or Any 3rd Party Ad System
- Includes Chess Game & Ability to Add Any HTML5 Game
- In App PatPal BiuyNow & Full Merchant Account Processing Screens
- Angular Internal Browser for Loading Local & Remote HTML sources
- Angular Cool-Looking ListViews, Toolbars & Navbars that Can Acess Any View
- iOS7 Frosted Panels for a Really Cool iPhone Effect
- Angular Wrapper for LocalStorage for Full-Database Features
- Cordova Barcode Scanner (Full Java Source Code)
- Cordova Compass to Motivate Repeated Use of App (5 Compasses & Full Java Source Code)
- Cordova User Data Scrapper Scrapes User Data for Targeted Ads (Full Java Source Code)
Creating powerful Angular 9 Mobile Apps is fast and easy. You just run Angular CLI and then unzip the src.zip file above and copy the contents into teh src directory created by the CLI and you have all the features above ready to go with full source code---WOW! If you would like to download the compiled Android apk file you can find that on my SwipeClouds website at: http://www.swipeclouds.com
Main GUI - Pinch to Resize Cloud
The main GUI is a SwipeCloud of floating images and you can swirl this cloud by swiping any of the images with your finger. Pinching the SwipeCloud with your fingers will increase and decrease the size of the SwipeCloud. This SwipeCloud is the main means of navigation for the Angular Mobile App and clicking on any of the images in the SwipeCloud will load a different view, which, in most cases will load the VideoComponent View for that particular group of video feeds from any tube server that allows embedding.
 |
Angular 9 Mobile App with a Very Different Look & Feel
with A Novel Approach to Navigation. JQuery has a lot of really cool, already-built CANVAS plugins like SwipeClouds, We set pinchZoom = true.
function TouchDown(e) { |
Cloud Collections... Each Cloud is a Theme
In the figure below you can see a variety of SwipeClods where each SwipeCloud represents a Theme. and each floating image, when clicked, loads into a ListView THOUSANDS of Videos, TV SHows and HD Movies from hundreds of Tube Servers around the world that you can watch either on your mobiel phone or on any Smart TV.

For eample you might might make one of the floating images your Channel on YouTube or any Channel you have on any Tube Server. Or, you might create a SwipeCloud of Medical Images where each image is a different Channel of the best Medical Videos on YouTube or any Tube Server. Or you might create a SwipeCloud of Beauty Images where each image loads all of the video from Beauty Blog Channels. let's face it, in today's world people want to watch a video as opposed to reading inormation and this Angular SwipeClouds Framework allows you to easily deliver MILLIONS of targeted videos. The images in teh SwipeCloud can be local in the app or retrieved remotely from different servers or you can use text instead of an image in the SwipeCloud of any size, font, or color. In the figure below you change from one SwipeCloud to another using the SwipeClouds Button in the header next to the button for changing backgrounds.
Animated & Fullscreen Video Backgrounds
Since our main GUI is a HTML5 Canvas we can easily apply animated gif files as backgrounds or a fullscreen video background. We can fill the entire background of our canvas with a video stream from a variety of sources such as local or remote video files or from the front or back camera on the phone itself. To add a video background simply use Fabric.js video functions applied to the canvas. To add video or animations INSIDE the SwipeCloud you would use the centreFunc in the options array oopts that allows you to create your own callback function to draw on the canvas between the front and back tags with an animation or video. as follows.
oopts = { ...  centreFunc: this.RSquare, ... }

RSquare(context2D, width, height, centreX, centreY) {
  // your code here
}

// In our Angular App we have a RSquare function
// to demonstrate adding an animation:
RSquare(c, w, h, cx, cy) {
  let d = ((new Date).getTime() % 10000) * Math.PI / 2500;
  c.setTransform(1, 0, 0, 1, 0, 0);
  c.translate(cx, cy);
  ... etc.
  c.fill();
}
As shown in the figure above, you can create Your Own Animations or Stream Fullscreen Video from the camera or other source using the centreFunc property in the options array oopts as follows:
oopts = { ... centreFunc: this.RSquare, ... }
The figure on the left shows an animated square rotating using the callback funtion RSquare as the centreFunc. You can create any callback function to create animations or to add a video layer with any opacity and size using Fabric.js video functions.
In the SwipeCloudsHeaderComponent when the Backgrounds Button shown above is clicked we cycle through to the next background as show below. 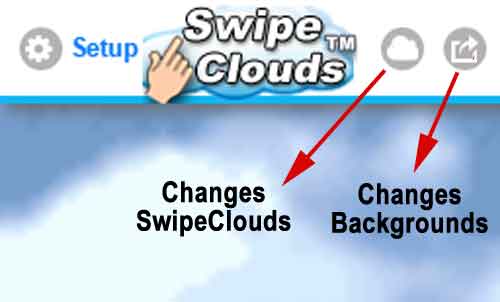
nextBackground(event) {
  event.preventDefault();
  let g = this.LocalStorage.get('settings_swipeclouds');
  if (g) {
    if (g.bgimage + 1 < Config.DATA_BACKGROUNDS.length) {
      g.bgimage = g.bgimage + 1; } else { g.bgimage = 0; }
      this.LocalStorage.set('settings_swipeclouds', g);
      document.getElementById('swipeCanvas').style.backgroundColor = '#000000';
      document.getElementById('swipeCanvas').style.backgroundImage = 'url(./assets/img/'
      + Config.DATA_BACKGROUNDS[g.bgimage] + ')';
      document.getElementById('swipeCanvas').style.backgroundSize = 'cover';
  }
}
In the SwipeCloudsComponent below we have loadBackground that was called from the SwipeCloudsHeaderComponent above.
loadBackground() {
    let g = this.LocalStorage.get('settings_swipeclouds');
    document.getElementById('swipeCanvas').style.backgroundColor = '#000000';
    document.getElementById('swipeCanvas').style.backgroundImage =
       'url(./assets/img/' + Config.DATA_BACKGROUNDS[g.bgimage] + ')';
    document.getElementById('swipeCanvas').style.backgroundSize = 'cover'; // 100% 100%;
    document.getElementById('swipeCanvas').style.cursor = 'pointer';
    // $('swipeCanvas').css({ 'cursor': 'pointer' });
} // end loadBackgroun
Video Layouts for Portrait & Landscape Views
Layouts for Portrait vs. LandscapeI decided that the best layout for video and the other views was to retain the Toolbar and Navbar in the Portrait Orientation and to Hide them in the Landscape Orientation. You can see this below. I added a button and code to stream the selected video from your mobile phone to any smart TV set using pairing from the tube server's site.
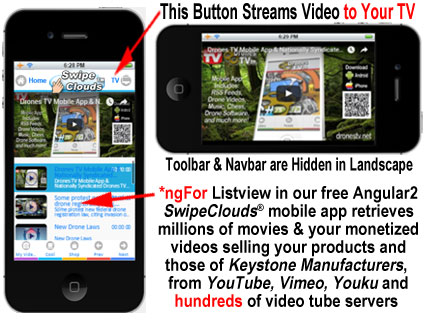
I also used this approach for the SwipeClouds view. It made sense that if the user needs access to the Toolbar or Navbar from the Landscape Orientation the user just rotates the phone to the portrait and the controls appear.
Create This Angular App - Install Node.js
Let's get started to building this Angular Mobile App by downloading Node.js which includes npm at https://nodejs.org/en/
At this point if you tried using npm it will most likely give you the dreaded and now famous error:
npm ERR! Windows_NT 6.1.7601
There are numberous working fixes for this error if you are behind a proxy but if you are'n't behind a proxy then trying to fix this error can make you crazy. Run the the commands below in a CMD window launched as ADMINISTRATOR:
npm config delete http-proxy
npm config delete https-proxy
npm config delete proxy -g
npm config delete http-proxy -g

THE REAL MAGIC TO FIXING THIS ERROR IS:
npm config set registry "http://registry.npmjs.org"
npm config set strict-ssl false
Angular 9 CLI
I like the speed of development with Angular CLI but I dislike how buggy it is to work with at this time. I really dislike companies like Google telling me what my app should look like or what IDE I should use. The purpose of this article is to walk beginners through creating an Angular 9 App using CLI so let's start.
Install Angular CLI which will also install Angular's "ng" command globally on your system:
Directions for installing Angular-CLI are at: https://github.com/angular/angular-cli#updating-angular-cli
[__b__]npm uninstall -g @angular/cli
npm cache clean
npm install -g @angular/cli@latest

To verify whether your installation
completed successfully, you can run:

ng version

@angular/cli: 1.0.0-beta.32.3
node: 7.4.0
os: win32 x64
Create Our Angular 9 Mobile App
Now that you have Angular CLI installed, you can generate an Angular Mobile App: Then create a directory for your Angular projects. On my computer I have a directory called "Angular." The name of this directory can be anything you want to call it. From inside that directory using the CMD prompt in administrator mode create your "first-app" as follows:
Select a folder - I used C:\Angular

C:\Angular>ng new first-app --routing--style=scss
Installing & Using Visual Studio Code IDE
I used Microspoft's Visual Studio Code IDE which you can easily download and install from: http://code.visualstudio.com/
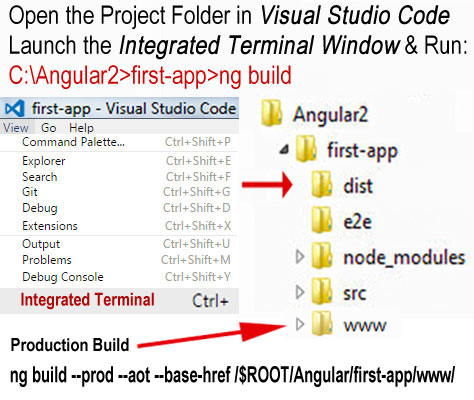
Open Visual Studio Code and select the project folder "first-app" and open the Integrated Terminal Window as shown below. In the Integrated Terminal Window in Visual Studio Code run the command below which will create your "dist" directory for your finished project.
Then run the default app installed by Angular-CLI as follows:
C:\Angular>first-app>ng serve
This will start our Node.js server running on port 4200 so if you open your Chrome Web Browser to http://localhost:4200 you will see the application running. This will run the default Angular app that comes with Angular CLI.
What Can Wrong When You Run The App?
Many users will get the error:
Module build failed: TypeError: Cannot read property 'newLine' of undefined
When you get this error it is typically caused by either an incorrect version of Angular - CLI. One fix that works is to run:
npm uninstall-g @angular/cli
npm clean cache
npm install Last-g @angular/cli @
then remove the local node_modules folder and run:
install npm–Save-dev @angular/cli @ Last
npm install
You must stay current with the latest changes at:
https://github.com/angular/angular-cli#updating-angular-cli
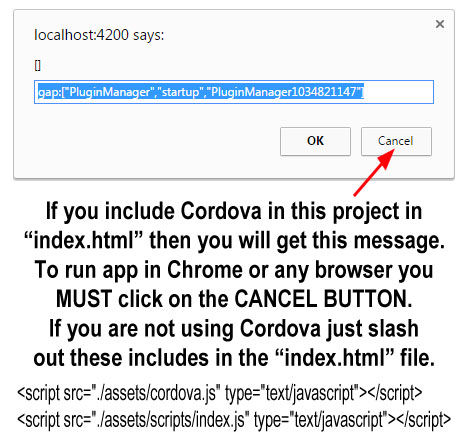
In the sample project I left the includes for Cordova. If you leave these Cordova includes in the "index.html" then you will get the message below - DO NOT HIT THE "OK" BUTTON or the app will not load. Just hit the "CANCEL" button and the app will run in the browser.
How to Compile Angular Apps as Mobile Apps Using Ahead-of-Time Compilation (aot)
Next we will add the source code for the source code for our mobile app to this default project. Download the zipped src.zip file posted above and empty the contents of the zipped "src" folder into the src folder of the project. And again run the command:
C:\Angular>first-app>ng serve
I will jump ahead here to explain how to build your "www" folder for mobile. The BIG SECRET to compilling an Angular App for Mobile that isn't obvious. To build an Amgular2 App so it will work as a Mobile App in xcode or Android Studio is setting up the pathways correctly. Look at the index.html from the src folder you added to the project and notice the following:
<script>document.write('<base href="' + document.location + '" />');<script>
Next we want to bundle our Angular Moble App for importing into XCODE (iPhone) or Android Studio. I will just discuss Android Studio here to keep this article shot since xcode is very similar. Bundles are generated by default to projectFolder/dist/. But this won't work for our mobile app. To create our MOBILE production build we need to use some extra commands: --base-href --aot.
[__b__]Run in command line when directory is projectFolder
flag prod bundle for production & flag aot enables the
ahead-of-time compilation also known as offline compilation.

ng build --prod --aot --base-href /$ROOT/Angular/first-app/www/
In the pathway above you will notice that I created a folder "Angular" on my "C" drive and created my "first-app" folder inside that directory. If you have your project in a different folder then adjust the pathway above accordingly. The contents of the generated "www" folder will go into our "www" folder in Android Stuidio and all the pathways will actually work. Viola!
Routing in Our Angular Mobile App
We have only a few simple views in our app, namely, swipeclouds, video, legal, cordova, and blank. In the VideoView the user can select videos to watch in the responsive Angular video Player contained in the video view. And blank is used as a fudge to keep down the codding.
// We have three real views and one fake view, i.e., blank:
let NavigationExtras: Array;
const routes: Routes = [
    {path: '', pathMatch: 'prefix', redirectTo: 'swipeclouds'},
    {path: 'swipeclouds', component: SwipeCloudComponent},
    {path: 'video', component: VideoComponent},
    {path: 'cordova', component: CordovaComponent},
    {path: 'browser', component: BrowserComponent},
    {path: 'rss', component: RssComponent},
    {path: 'reader', component: ReaderComponent},
    {path: 'ads', component: AdsComponent},
    {path: 'blank', component: BlankComponent},
    {path: '**', pathMatch: 'prefix', redirectTo: ''}
];
Angular Wrapper for LocalStorage as Service
For use throughout our mobile app to pass data I decided to use localstorage so I created this simple class for localstorage that imports Injectable. So when you see references to localstorage we are just calling this class in our app.
import { Injectable } from '@angular/core';

@Injectable()
export class LocalStorageService {
  private isLocalStorageEnabled: boolean;
  private isLocalStoragePresent: boolean;

  constructor() {
    this.checkSupport();
  }
... etc
Using JQuery & JQuery Plugins in Angular 9
There are several ways to add JQuery and JQuery Mobile to Angular but I use a simple one that has always worked for me. I place the links right inside the header of the index.html file and all of the supporting .js files and .css files inside the "assests" folder in the project.
The Angular SwipeCloudComponent Canvas
To create this Angular component we use Microsoft's typeScript as follows: To do this we move into our "components" folder and generate the basic files using the command below in another instance of our Integrated Terminal Window.
C:\Angular>first-app>src>app>components>ng generate component swipe-cloud
And in our typescript file, swipe-cloud.component.ts, we add our canvas and JQuery with a simple declaration at the top of this file as follows:
declare var TagCanvas: any;
declare var jQuery: any;
declare var $: any;

We instantiate our canvas as follows in the constructor
where 'swipeCanvas' is the ID of our canvas elemnt:

try {
  TagCanvas.Start('swipeCanvas', Config.DATA_CLOUDS[0], Config.DATA_CLOUD_OPTS);
} catch(e) {}
We can access our canvas either through JQuery or directly using plain JavaScript through "TagCanvas" which is very straightforward. In a similar manner we create a SwipecloudHeaderComponent that has buttons to rotate through our array of clouds and to chnage the backgrounds of our canvas. The click event of the Clouds Button in this header component is shown below. I used query parameters and ActivatedRoute to receive those parameters in the same view we are sending them from as shown below:
[__b__]nextCloud(event) {
   event.preventDefault();
   let s = this.LocalStorage.get('cloud_swipeclouds');
   if (s) {
      if (s.cloudid + 1 < Config.DATA_CLOUDS.length) {
         s.cloudid = s.cloudid + 1;
      } else { s.cloudid = 0; }
      this.LocalStorage.set('cloud_swipeclouds', s);
   }
   this.cloudsheaderrouter.navigate(['/blank']);
   setTimeout( () => {
      this.cloudsheaderrouter.navigate(['/swipeclouds',
          {action: 'nextcloud', actionid: s.cloudid }]);
   }, 1);
}
In the click event above we get the ID of the next cloud in our cloud array, Config.DATA_CLOUDS, we cheat a bit by telling our router that we want to load our "blank" view and then we tell our router to go back to our current view passing the parameters "action" and "actionid" to our current view.
oopts = {shape: 'sphere',zoom: 1.0,maxSpeed: .04,...}

// get URL parameters
this.sub = this.route
.params
.subscribe(params => {
    const _action: any = params['action'];
    const _actionid: any = params['actionid'];
    // alert('_action: '+_action);
    if ((_action === 'undefined') ||
          (_actionid === 'undefined')) {
    } else if(_action === 'nextcloud') {
    try { this.cloudID = _actionid; } catch(e) { }
    } else if(_action === 'drag') {
    this._drag = _actionid;
    if(_actionid === 'on') { this.oopts.dragControl = true; }
    if(_actionid === 'off') { this.oopts.dragControl = false; }
    try { TagCanvas.Start('swipeCanvas',
                               Config.DATA_CLOUDS[this.cloudID], this.oopts);
    } catch (e) { }
    } else if(_action === 'shape') {
    const s = _actionid;
    this.changeshape(s)
    try { TagCanvas.Start('swipeCanvas',
                              Config.DATA_CLOUDS[this.cloudID], this.oopts);
    } catch (e) { }
  }
},
(err) => {
console.log('error!', err);
});
I should point out that there are many ways for the swipe-cloud-header to send the click event to the swipe-cloud component but because of the relative positioning of these componets it turns out that this approach worked best for me. For changing backgrounds I decided to directly change the background using getElementById('swipeCanvas'):
nextBackground(event) {
  event.preventDefault();
  let g = this.LocalStorage.get('settings_swipeclouds');
  if (g) {
    if (g.bgimage + 1 < Config.DATA_BACKGROUNDS.length) {
         g.bgimage = g.bgimage + 1; } else { g.bgimage = 0; }
     this.LocalStorage.set('settings_swipeclouds', g);
     document.getElementById('swipeCanvas').style.backgroundColor
        = '#000000';
     document.getElementById('swipeCanvas').style.backgroundImage
        = 'url(../../assets/img/'
          + Config.DATA_BACKGROUNDS[g.bgimage] + ')';
     document.getElementById('swipeCanvas').style.backgroundSize
        = 'cover';
  }
}
Angular Data Service & VideoComponent
The VideoComponent will retrieve video feeds from the hundreds of tube servers that allow enbedding in webpages. In addition to displaying millions of movies and all kinds of videos this code will also display YOUR monetized videos from these Tube Servers like YouTube among movies and other videos. The structure for our feeds is as follows:
let s = this.LocalStorage.get('feeds_swipeclouds');
if (s) {
    let s = this.LocalStorage.get('feeds_swipeclouds');
              this._category = s.category; // feed category
              this._mcat = s.mcat;         // movie or video subcategory
              this._start = s.start;       // number of ad to start with
              this._max = s.max;           // maximum feeds to retrieve
          this._pc = s.pc;             // postal code for ads
          this._rad = s.rad;           // postal code radius
}
Notice that I used the postal code above and the postal code radius for delivery of trageted ads to the phoneuser's current location. I have found that selling video ads (TV Spots) to air in a mobile app like this one works best by selling a collection of zip codes and a zip code radius of say 50 miles. That means that the video ads retied from the server will be ads set to match those zip codes and zip code radius from local advertisers. Let's begin by looking at how we load the Video Compoent View. In our Swipe Clous Component, clicking on any of the floating images in our Swipe Cloud that load videos causes the CallRoute method to be called as shown below:
<a ((click)="CallRoute($event,'dtv_flyingbikes')" href="#" title="Hover Boards" type="button">
   <img alt="Icon 01" src="assets/img_drones/1_flyingbikes.png" />
</a>

CallRoute(event, categoryRef: string) {
event.preventDefault();
let s = this.LocalStorage.get('feeds_swipeclouds');
if (s) {
    s.category = categoryRef;
    s.start = 0;
    this.LocalStorage.set('feeds_swipeclouds', s);
}
this.cloudsrouter.navigate(['/video', {category: categoryRef, start: 0}]);
}
As you can see above we call navigate on the cloudsrouter and pass in our url parameters, namely, "category" and "start" into the Video View. In the Video Component we receive the passed url parameters and call getFeedsl() or getFeedsLocal() from our data service as follows:
[__b__]// get URL parameters
this.sub = this.route
  .params
  .subscribe(params => {
  this._category = params["category"];
  this._start = params["start"];
  // This allows you to stream to Digital TV sets!
  if (this._category === 'playontv') {
    let z = this.LocalStorage.get('selected_video_swipeclouds');
    if (z) {
      if (z.linkType === 'embed_youtube') {
        window.open('https://www.youtube.com/watch?v=' +
                      z.linkValue, '_self', '', true);
        // add this to make back button work correctly!
        this.location.go('');
      } else if (z.linkType === "channel_youtube") {
        window.open('https://www.youtube.com/results?search_query=' +
                     z.linkValue, '_self, '', true);
        // add this to make back button work correctly
                this.location.go('');
      }
    }
  }
  // You should retrieve data using JSONP
  if (Config.DATA_SOURCE === 'remotejsonp') {
    this.getFeeds();
  }
  if (Config.DATA_SOURCE === 'localjson') {
    this.getFeedsLocal();
  }
});
The call to our data service, DataObservableService, will retrieve a list of videos locally or remotely from Tube Servers that allow embedding of videos in web pages. The retrieval of data locally is trivial so I will focus on retrieval of remote data and this app's use of JSONP to accomplish which is the preffered method for retrieving data as shown below:
[__b__]constructor(private http: Http,
  private _jsonp: Jsonp,
  private sanitizer: DomSanitizer,
  private LocalStorage: LocalStorageService) {
    this.headers = new Headers(
  {
    'Content-Type': 'application/json',
    'Accept': 'q=0.8;application/json;q=0.9',
    'async': true,
    'dataType': 'jsonp'
  });
  this.options = new RequestOptions({ headers: this.headers });
}

getServiceFeedsJsonp(): Observable<any> {
  let s = this.LocalStorage.get('feeds_swipeclouds');
    if (s) {
      let s = this.LocalStorage.get('feeds_swipeclouds');
      this._category = s.category; // feed category
      this._mcat = s.mcat;         // movie or video subcategory
      this._start = s.start;       // number of ad to start with
      this._max = s.max;           // maximum number of feeds to retrieve
      this._pc = s.pc;             // postal code for ads
      this._rad = s.rad;           // postal code radius
   }
  const jsonp_base = Config.JSONP_DOMAIN1;
  let jsonp_param = 'cat=' + this._category +  '&mcat=' +
    this._mcat + '&start=' + this._start + '&max=';
  jsonp_param = jsonp_param + this._max + '&pc=' + this._pc
    + '&rad=' + this._rad + '&methodName=Feeds&jsonp=JSONP_CALLBACK';
  let jsonp_rnd = '&rnd=' + this.getRandomInt(1, 500);
  let jsonp_url = jsonp_base + jsonp_param + jsonp_rnd;
    return this._jsonp
      .get(jsonp_url, this.options)
      .retry(this.retryCount)
      .map( (res) => {
        const feeds = res.json();
        this.checkFeeds(feeds);
        return feeds;
      })
      .catch(this.handleError);
    }
JSONP Video Server for Angular Advertsing
Some people may have trouble getting JSONP to work so I will explain some of the things you need to know. You can run a JSONP server easily on your server with a few lines of PHP code or you can use C# .NET etc.
The design concept I used for my JSONP server was that instead of having multiple generic handlers or a single handler with lots of switch/if statement I decided to use a single generic handler with Factory Design Pattern. The Factory returns a class based upon the methodName that is passed which is used to only handle that request. The Factory reads the methodName and its class from the web.config file and instantiates the handler. The generic handler requests the Factory for the handler and performs some pre/post processing.
Here is a link to an article I wrote on creating a JSONP Videos & TV Commercials server using C# .NET which is what I used in testing the JSONP code in this Angular Mobile App to stream MILLIONS of tube servers videos, movies, TV shows, and TV commercials:
JSONP Server to Stream Videos. Movies, TV Shows, Tube Channels, and TV Ads from Hunndreds of Tube Servers:
C# .NET JSONP Server
Most people have problems getting this one part of the url correct:
&methodName=Feeds&jsonp=JSONP_CALLBACK'
Look at the "jsonp" in the line above - the letters is determined by your JSONP sever and will vary from server to server. In my C# JSONP Server I used "jsonp" but you will also see in other servers "callback", or just "c" but its value is based on the server. In other words, don't just use what you commonly see in articles like "callback" but check to see what the JSONP server you are connecting to requires.
The Angular Cool-Looking ListViews
This is pretty straightforward and we simply use *ngFor to create our ListView in our Video componet as follows:
<li *ngFor="let feed of feeds;let i = index" data-icon="false"
    data-role="listview" [class.active]="i == selectedRow"&g
   <div [ngClass]="['duration-cover']" (click)="clicked($event, feed, i)">
      <div [ngClass]="['duration-left']">{{feed.duration}}</div>
      <img [ngClass]="['rounded-img']" src="{{feed.image}}" />
    </div>
    <h3 [ngClass]="['ellipsis']">{{feed.title}} </h3>
    <p [ngClass]="['ellipsis2']">{{feed.shortDescription}} </p>
</li>
Unlike most listviews I decided to place the Click on the image in the row INSTEAD of the row itself so that I can easily move the list up and down without accidently click the row. I will be updating the code to load this listview in the near future with lots of options to modify how this listview displays your monetized video ads from your channels on tube servers among the videos and movies users request so you can make money from views and selling your own products in the videos from your channels on these tube servers.
There are 2 very different ListViews in our sample Angular Mobile App, namely, one that displays feeds that when clicked with load the view in teh same view and another type that load html and text information with only links to videos. For example, if you click on any image in the Medical Cloud it will load text and HTML information about that topic in the RssComponent View created to display text and HTML as opposed to video.
Playing Embed Videos in Angular
This is pretty straightforward and we simply use bypassSecurityTrustResourceUrl in our Video componet to retrive a safe "url" object as follows:
[__b__]clicked(event, pageRef: any, zindex: any) {
    event.preventDefault();
    this.setClickedRow(zindex);
    this.page = this.sanitizer.bypassSecurityTrustResourceUrl(pageRef.link);
    $('#yt_player').attr('src', this.page);
    let z = this.LocalStorage.get('selected_video_swipeclouds');
    if (z) {
        z.linkType = pageRef.linkType;
        z.linkValue = pageRef.linkValue;
        this.LocalStorage.set('selected_video_swipeclouds', z);
    }
}
I created a Angular Tabbed NavBar Compoent, namely, VideoNavbarComponent, and for our Video Compoent we have Prev and Net Tabs that work as shown below to next the next group of videos from out JSONP Server:
<li type="button" class="bcolor_red"><a (click)="prev($event, 'prev')" data-icon="arrow-l">Prev</a>
<li type="button" class="bcolor_blue"><a (click)="next($event, 'next')" data-icon="arrow-r">Next</a>

next(event, pageRef: string) {
event.preventDefault();
let s = this.LocalStorage.get('feeds_swipeclouds');
if (s) {
  s.start = s.start + s.max;
  this.LocalStorage.set('feeds_swipeclouds', s);
  this.videonavbarrouter.navigate(['/blank']);
  setTimeout( () => {
    this.videonavbarrouter.navigate(['/video', { start: s.start }]);
    }, 1);
  }
}
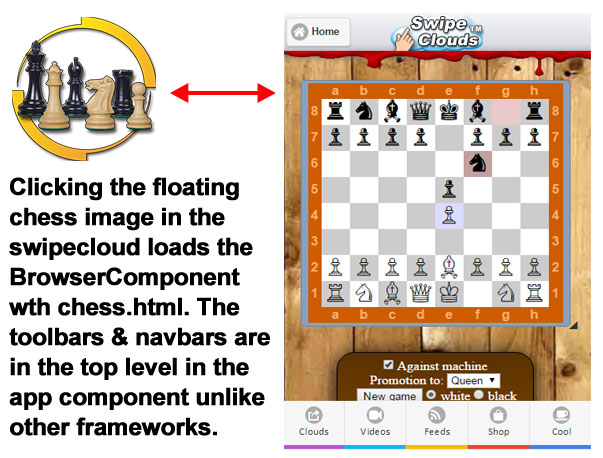
BrowserComponent, Chess & HTML5
I also added to this Angular Mobile App a fantastic html Chess Game Stefano Gioffre. The big advantage to adding JQuery to Angular is that there are hudreds of cool html games like chess that can be easily dropped into the sample prject by simply loading them into an iFrame. So I decided to add a BrowserComponet that contains an iFrame in the html as shown below that can be loaded with local or remote webpage.
<iframe id="iframe" name="iframe" [src]='page' scrolling="yes"
    marginheight="0" frameborder="0" webkitallowfullscreen
    [attr.width]='_zwidth' [attr.height]='_zheight'
    mozallowfullscreen allowfullscreen></iframe>
And in the BrowserComponent we subscribe to route as follows;
    this.sub = this.route
      .params
      .subscribe(params => {
        this._zwidth = window.innerWidth;
        this.zurl = params['url'];
    });
And loading the html chess is as simple as the following:
    this.cloudsrouter.navigate(['/browser', {name: 'chess',
      url: './assets/chess/chess.html'}])
Using the Browser Component you can easily drop in already existing html5 games thata you don't have time to rewrite in Angular. The BrowserComponent lets you easily display html that is local or remote from your license agreement to existing games like chess shown below.
In App PayPal BuyNow & Order Processing
In my SwipeClouds® Framework I used the Angular Browser Component to add In App PayPal BuyNow and General Merchant Account Processing by simply loading the JavaScript Web Pages I use for both PayPal and my other merchant accounts.

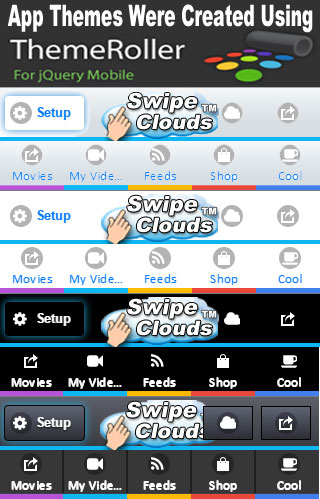
Mobile App Themes & Frosted Panels
In my SwipeClouds® Framework I used JQuery Mobile's ThemeRoller to create the following themes as shown below:
- light
- dark
- ios7light
- ios7dark
The Toolbars and Navbars are shown below for these themes.
The next question I had to answer was how I woulkd switch between these themes in the mobile app and the technique that worked the best was to set in the index.html page the following:
<link id="link_swipeclouds" href="" rel="stylesheet" type="text/css" />
Then to change a theme we would simply call changeTheme as shown below::
// (click)="changeTheme($event, 'ios7light')"
changeTheme(event, themeRef: string) {
    event.preventDefault();
    let s = this.LocalStorage.get('settings_swipeclouds');
    if (s) {
        s.themeid = themeRef;
        this.LocalStorage.set('settings_swipeclouds', s);
    }
    const _path = './assets/styles/themes/' + themeRef + '.css';
    $('#link_swipeclouds').attr('href', _path);
}
How to Create iOS7 Frosted Panel Look
By clicking the "Setup" button on the top-left of the main screen you will slide out the frosted control panel where you can set other options for this Angular Mobile App.
 |
I really like the frosted panel look and feel in iPhones
In order to blur or frost what is under the sliding panel You will also notice that I placed the controls on a This is accomplised in the app as foolows using a simple class: class="frosted ui-panel" |
Cordova & PhoneGap Plugins
I included 3 Cordova Plugins with full Java Souirce Code in this project. You DO NOT have to include these plugins in your own project. If you do want to add these Cordova Plugins then download the android file at the top of this article and which includes the Java Source Code for the Cordova Plugins below and add that to Android Studio. I will post in the next week or so the Objective C versions of these plugins for the iPhone and XCODE coompilier. Notice that since we are adding the Java Source Code directly to Android Studio for these plugins all we need to call them is to use "cordova.exec" in javascript.
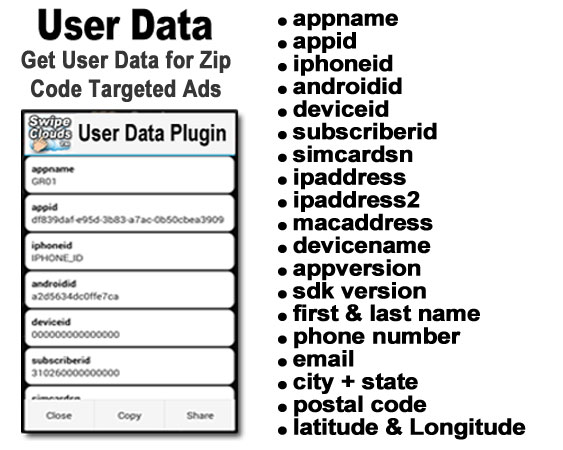
- User Data Plugin - SCRAPES user data including zip code & cross references with free databases to retrieve over 400 data points about each mobile user so you can target your monetized video ads from YouTube and other Tuber Servers to that user at no cost to you.
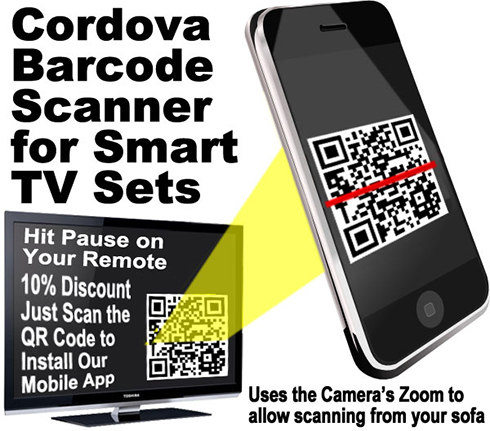
- BarCode Scanner Plugin - Uses camera's zoom to help scan QR Codes on Smart TVs for order processwing & installing our mobile app
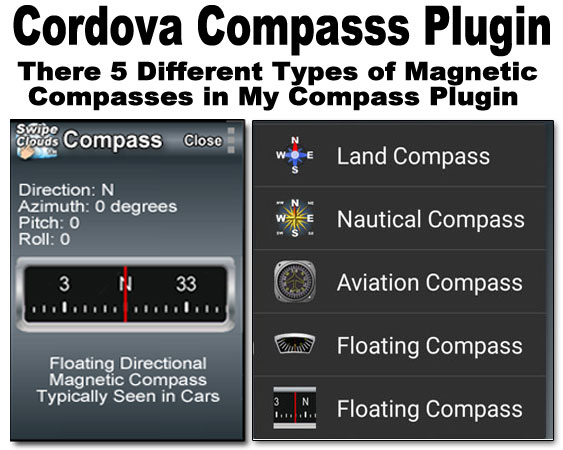
- Compass Plugin - Gives users 5 different compasses to choose from to motivate user to repeatedly use mobile app
- Coming Soon - I will be adding another plugin with full source code to this sample mobile app shortly that will install from the app my free SwipeClouds® Cable Guide on Smart TVs that will display your monetized videos in addition to regular TV programming in a cable guide you can customize on any smart TV.
Clicking on a floating image in the swipecloud can directly launch a Cordova Plugin. But for the purposes of illustrating the Cordova Plugins in the attached sample Anuglar 2 Mobile App I thought I would create a scrolling list of all of the included Cordova Plugins from an array that describes the 2 pligins in our app as shown below.
this.cordovatools  = [
{
  title: 'Cordova User Data Plugin Dialog',
  description: 'Displays Scrapped User Data in Java Dialog',
  linkValue: 'showUserDataListView',
  image: '1_infodialog.png',
  rank: 100
},
{
  title: 'Cordova User Data Plugin JSON',
  description: 'Returns Scrapped User Data in JSON Format',
  linkValue: 'getUserDataJson',
  image: '1_infojson.png',
  rank: 99
},
{
  title: 'Cordova Compass Plugin',
  description: 'Different Compasses',
  linkValue: 'compass',
  image: '1_compass.png',
  rank: 98
},
{
  title: 'Cordova Barcode Scanner Plugin',
  description: 'Barcode Scanner',
  linkValue: 'scanner',
  image: '1_scan.png',
  rank: 97
}];
I created this list of plugins to illustrate to the reader how to make *ngFor work with data arrays by converting the data using the following:
  generateArray(obj) {
    return Object.keys(obj).map((key) => {
      return obj[key];
    });
  }
So by using "generateArray(obj)" we can then use *ngFor to create our list of Cordova Plugins.
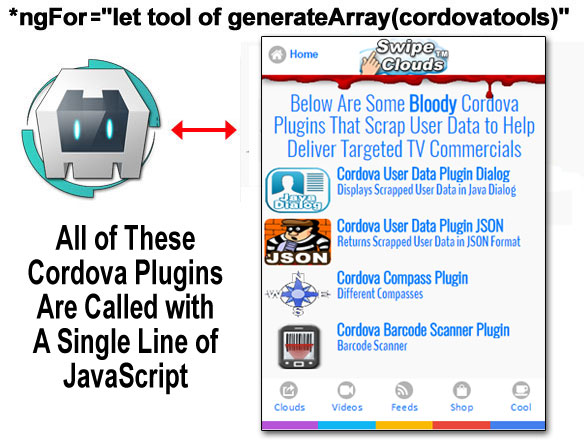
In this Angular Mobile App I call these Cordova Plugins from a listView of Cordova Plugins shown above. We have to create an Array from our static data describing these plugins using "generateArray" in order for our *nfFor loop to work as shown below. I recommend writing your own Java Cordova cdoe in Android Studio and using Cordova's bridge to call it as shown below.
// Our listView of Cordova Plugins Using *ngFor in html
<li *ngFor="let tool of generateArray(cordovatools)" data-icon="false" data-role="listview">
  <div [ngClass]="['duration-cover']" (click)="CordovaPlugin($event, linkValue)">
    <img [ngClass]="['rounded-img']" src="../../../assets/img/{{tool.image}}" />
  </div>
  <h3 [ngClass]="['ellipsis']">{{tool.title}}</h3>
  <p [ngClass]="['ellipsis2']">{{tool.description}}</p>
</li>

// In our cordova.component.ts file
import ...
declare var cordova: any;

  CordovaPlugin(event, categoryRef: string) {
    event.preventDefault();
    let _param = 'User Data';
    if (categoryRef === 'showUserDataListView') {
      cordova.exec(this.showUserDataSuccess, this.showUserDataFailure, 'UserDataPlugin',
      'showUserDataListView', [_param]);
    } else if (categoryRef === 'getUserDataJson') {
      cordova.exec(this.getUserDataJson, this.showUserDataFailure, 'UserDataPlugin',
      'getUserDataJson', []);
    }else if (categoryRef === 'compass') {
      _param = 'Compass';
      cordova.exec(this.showCompassSuccess, this.showCompassFailure, 'CompassPlugin',
      'showCompass', [_param]);
    } else if (categoryRef === 'floatcompass') {
      _param = 'float';
      cordova.exec(this.showCompassSuccess, this.showCompassFailure, 'CompassPlugin',
      'floatCompass', [_param]);
    } else if (categoryRef === 'scanner') {
      // this.cordovarouter.navigate(['/scanner']);
      cordova.exec(this.showScannerSuccess, this.showScannerFailure, 'BarcodeScanner', 'scan', []);
    }
  } // end CordovaPlugins
Cordova TV Barcode Scanner Plugin
I added a Cordova BarCode Scanner Plugin to our Angular Mobile App. You have in the download at the top of this article all of the Java source code for all of the Cordova Plugins for Android including this barcode scanner. You should be aware that since you have all of the source code for all of the plugins and your are adding that Java code to your Android Studio that you can now call these DIRECTLY by just calling "cordova.exec" and which makes things easier.
One Way to Help Distribute Your Angular SwipeClouds Mobile Apps
My company has tested various ways of distributing and making money with mobile apps in the last few years and one way that does work is to create a one- to two-minute videowith an aspect ratio of 1280 x 720 that has a QR Code to allow viewers to download and install your mobile app. Use one QR Code for both Android and iPhone where your link in the QR Code goes to a web service that records type of device then redirects to your Andoid .apk or iPhone .ipa file on your own server or on one of the many shareware sites that allow mobile apps.
I don't reccommend using your Google's Play Store or Apple's App Store links for your QR Codes. Your download links for QR Codes should be to your own server or to sites that won't close down your accopunt if you aren't politically coorect enough for them.
Put your video with your QR Code on YouTube.com and Youku.com which are the two best tube server sites we have found for this purpose. Youku is the largest television network in the world and it reaches consumers who will buy almost anything.
The Android Mobile App in the sample project with this article includes a Cordova BqarCode Scanner that uses the camera zoom to make it easy for people to scan QR Codes on their Smart TV Sets from from their sofas without having to get up close to their TV set. After a TV viewer has scanned the QR Code on their TV Set and install your mobile app you can then easily stream TV Commercials, i.e., videos, to their mobile phones and Smart TV sets if those users grant you permission to do so. We have found in testing that most people don't mind the occassional ads because among those video ads are videos and movies that they want to watch.
Add QR Codes to Your YouTube Videos
If you have any videos on YouTube or elsewhere on the web that sell products then you should have a QR Code on those videos that allow viewers to order your products when the QR Code is scanned. I will add to this article shortly a sample QR Code and Angular code behind it that will do the following when scanned:
- Allow Viewers to Order Your Product
- Popup That Offers Viewers Your Incentive to Install Your Mobile App
- Installs Your Mobile App After Order is Placed with Viewer's Consent
Cordova UserDataPlugin for Zip Radius Ads
Although making Cordova Plugins is NOT part of this article I will briefly outline one of the incuded Cordova Plugins in this project the reader may find helpful. It is important when a user downloads your app to collect, with the user's permission, as much useful data as possible. You should provide a clear and easy-to-understand description of the data you collect and how you use it in your Terms of Service (TOS) and make users scroll your TOS and click they have read and understand it.
In my Android UserDataPlugin I call a AlertDialog in Java on Android and Objective C on the iPhone with a scrolling list of this data. The ability to deliver targeted advertising in your app always increase revenues. In my own expereince I have found that retrieving the user's zip code is the best way of delivering targeted ads within a given zip radius of the user's zip code. The UserDataPlugin collects the data below and uploads part of that data to a server for cross referencing with various databases such as the census database, the Polical Action Committe databases (PAC database from the GAO), the state databases like the DMV (Dept of Motor Vehicles), etc. Of all these databases we have found the U.S. Government's free PAC database to provide the most detailed and intimate information on millions of the wealthiest Americans. The PAC database contains banking and credit data that is legal to use to target a wide range of products and services based upon mortgage and credit data you get legally from this amazing PAC database. The image below shows the Scraped User Data displayed in a Java Alert Dialog called through the plugin.
You can return a JSON Object with the data in your JavaScript as follows.
IN THE JAVA PLUGIN CODE:
if (action.equals("getUserDataJson")) {
  try {
    final DeviceUuidFactory myGuid = new DeviceUuidFactory(cordova.getActivity());
    cordova.getThreadPool().execute(new Runnable() {
      public void run() {
        callbackContext.success(myGuid.getJSONData()); //Thread-safe.
      }
     });
  } catch (UnsupportedEncodingException e) {
    e.printStackTrace();
  }
  return true;
}
You can also return a JSON Object from your Cordova Plugin as shown in the Java code above and parsing this Java Object in JavaScript is very simple as shown in the JavaScript code below.. In particul;ar, you would call the UserData Plugin at any point in your app and store this User Data so you can pass into your JSONP calls to your ad server parameters such as Latitude and Longitude. I will be posting an updated versions of this UserData Plugin in Java and Objective C code browser buying abd search data with user's permission to help users find bargains for the products they want to buy.
IN YOUR JAVASCRIPT CODE:
cordova.exec(this.getUserDataJson, this.showUserDataFailure,
  'UserDataPlugin', 'getUserDataJson', []);

getUserDataJson(result) {
  const displaydata = 'appname: ' + result.appname
  + '\n\nappid: ' + result.uuid_appid
  + '\n\niphoneid: ' + result.iphoneid
  + '\n\nandroidid: ' + result.androidid
  + '\n\ndeviceid: ' + result.deviceid
  + '\n\nsubscriberid: ' + result.subscriberid
  + '\n\nsimcardsn: ' + result.simcardsn
  + '\n\nipaddress: ' + result.ipaddress
  + '\n\nipaddress2: ' + result.ipaddress2
  + '\n\nmacaddress: ' + result.macaddress
  + '\n\ndevicename: ' + result.devicename
  + '\n\nappversion: ' + result.appversion
  + '\n\nsdk: ' + result.sdk
  + '\n\nname: ' + result.name
  + '\n\nph: ' + result.ph
  + '\n\nemail: ' + result.email
  + '\n\ncity: ' + result.city
  + '\n\nstate: ' + result.state
  + '\n\nctry: ' + result.ctry
  + '\n\npc: ' + result.pc
  + '\n\nlat: ' + result.lat
  + '\n\nlng: ' + result.lng
  + '\n\n';
  alert(displaydata);
}
Cordova Compass Plugin
In the Cordova Compases Plugin I created for this project I created 5 different types of compasses you can selct from the menu as shown below.
Final Thoughs
Angular is very easy to learn and work with to rapidly create Angular Mobile Apps. And, best of all, you don't need any third-party frameworks like Ionic, Onsen, Nativescript, etc. JQuery Mobile does a great job for the GUI and there are plenty of JQuery plugins you can just use as is..
The sample Angular Mobile App in this article is designed to deliver millions of videos, movies, TV shows, and TV commercials from hundreds of tube servers like YourTube, Video and the largest, Youku.com. If you have a channel on YouTube or any tube server you can put that channel into this app remotely by placing it on a JSONP server like the one in the link in this article.
If you would like to download the compiled Android apk file you can find that on my websites at: http://www.swipeclouds.com
and
http://www.SerGioApps.com